Education
Featured Project:
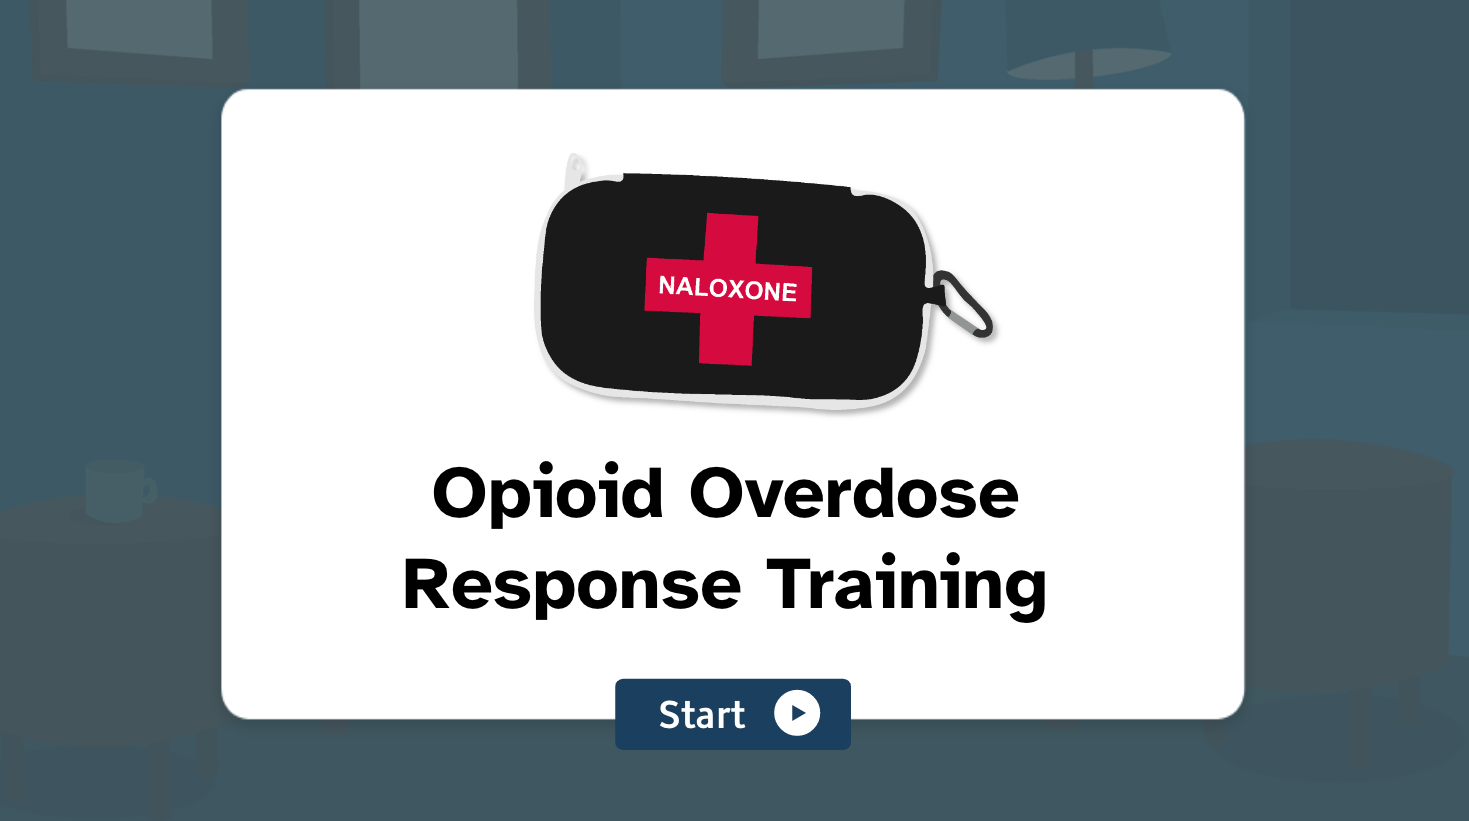
Opioid Overdose Response Training
Overview
This scenario-based e-learning module guides new community service volunteers through a simulated opioid overdose response.
Responsibilities: Analysis, Instructional Design, eLearning Development, Illustration, Graphic Design, Writing
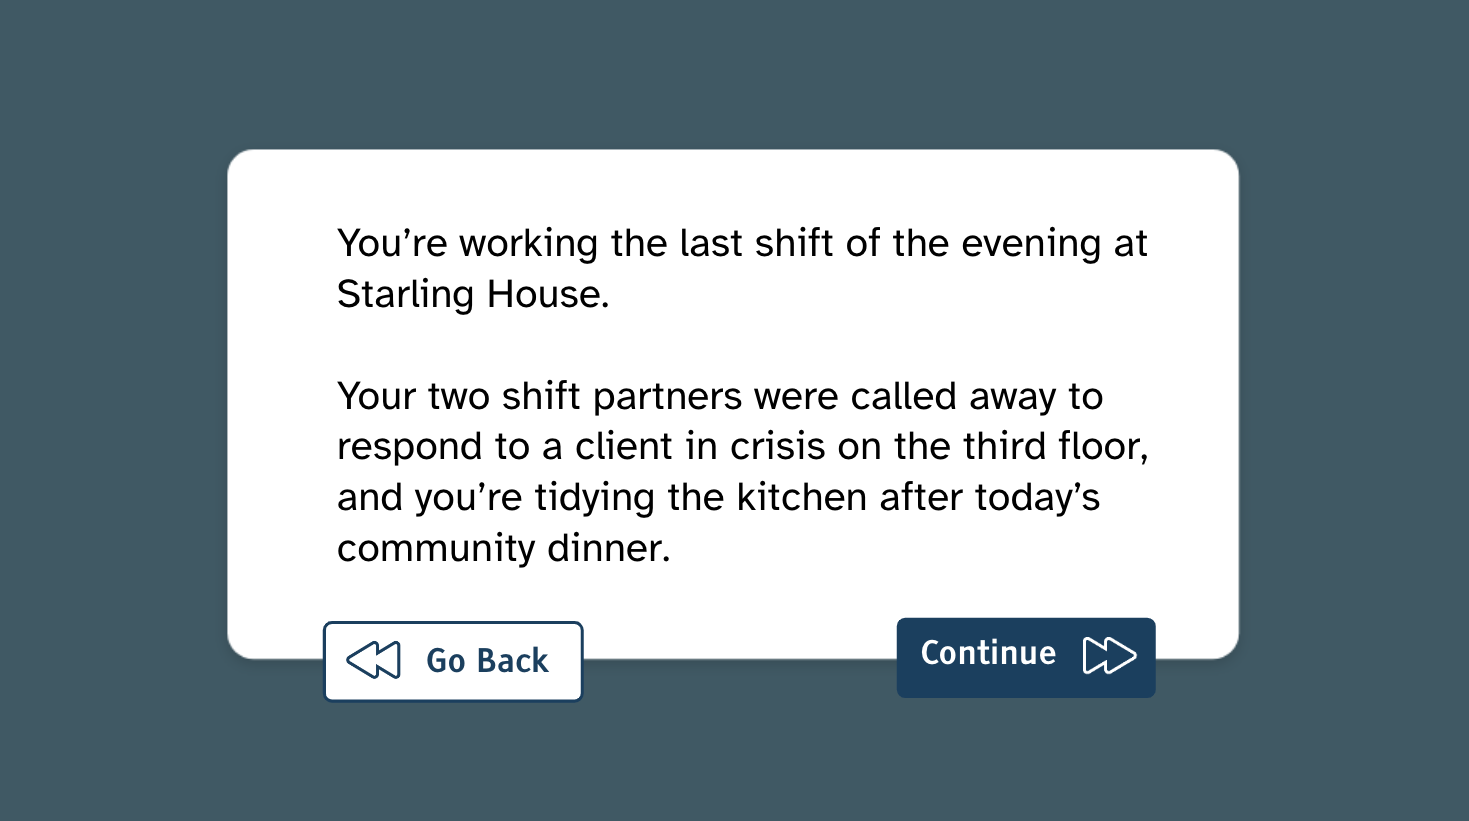
Target audience: New volunteers at Starling House Community Services, a fictitious organization based in Toronto
Tools used: Figma, Google Docs, Adobe XD, Adobe Illustrator, Adobe Photoshop, Adobe InDesign, and Articulate Storyline and Review 360

Note: The full training takes about 30-40 minutes to complete.
Short on time? No problem! Use the Table of Contents shortcut (hamburger menu) on the title slide to skip ahead to any part of the training you’d like. If you leave the tab and return, you can select “restart” to go back to the title slide any time.
You can also view and download the supplementary materials separately:

Background
The Need
According to the Government of Canada’s 2017 Survey on Opioid Awareness (the most recent data available as of August 2023), only 28% of respondents answered that they could identify the signs of an opioid overdose, and just 10% reported knowing how to administer naloxone.
My fictitious client, Starling House Community Services, provides services for Toronto residents experiencing mental health and substance use challenges. When organizations like Starling House offer opioid overdose response training, it’s often an in-person demonstration provided during volunteer orientation or as a periodic review for staff.
In-person training is ideal for handling naloxone equipment and asking questions in real-time, but it comes with unavoidable limitations. Trainees can’t review the training at their own pace or more than once, and they don’t usually get to practice during a simulated overdose scenario. Additionally, non-profit staff are stretched thin over many responsibilities, so time constraints can limit the scope of background information that gets covered.
While some naloxone training resources do exist online, many of these are videos or text-based presentations with limited interactivity and no immersive or scenario-based components.
Given that most Canadians don’t know how to administer naloxone, Starling House wanted to supplement their in-person training so volunteers from any starting point could feel confident in their ability to respond to an opioid overdose. An online training component also eases some of the burdens on Starling House staff to provide exhaustive training in a single session.
The Solution
To complement and precede Starling House’s in-person orientation training, I developed a scenario-based e-learning experience that provides key background knowledge and guides learners through a simulated opioid overdose response. By practicing steps and skills in a risk-free virtual environment, learners can take the time they need to gain confidence and feel prepared to handle a similar situation in real life.
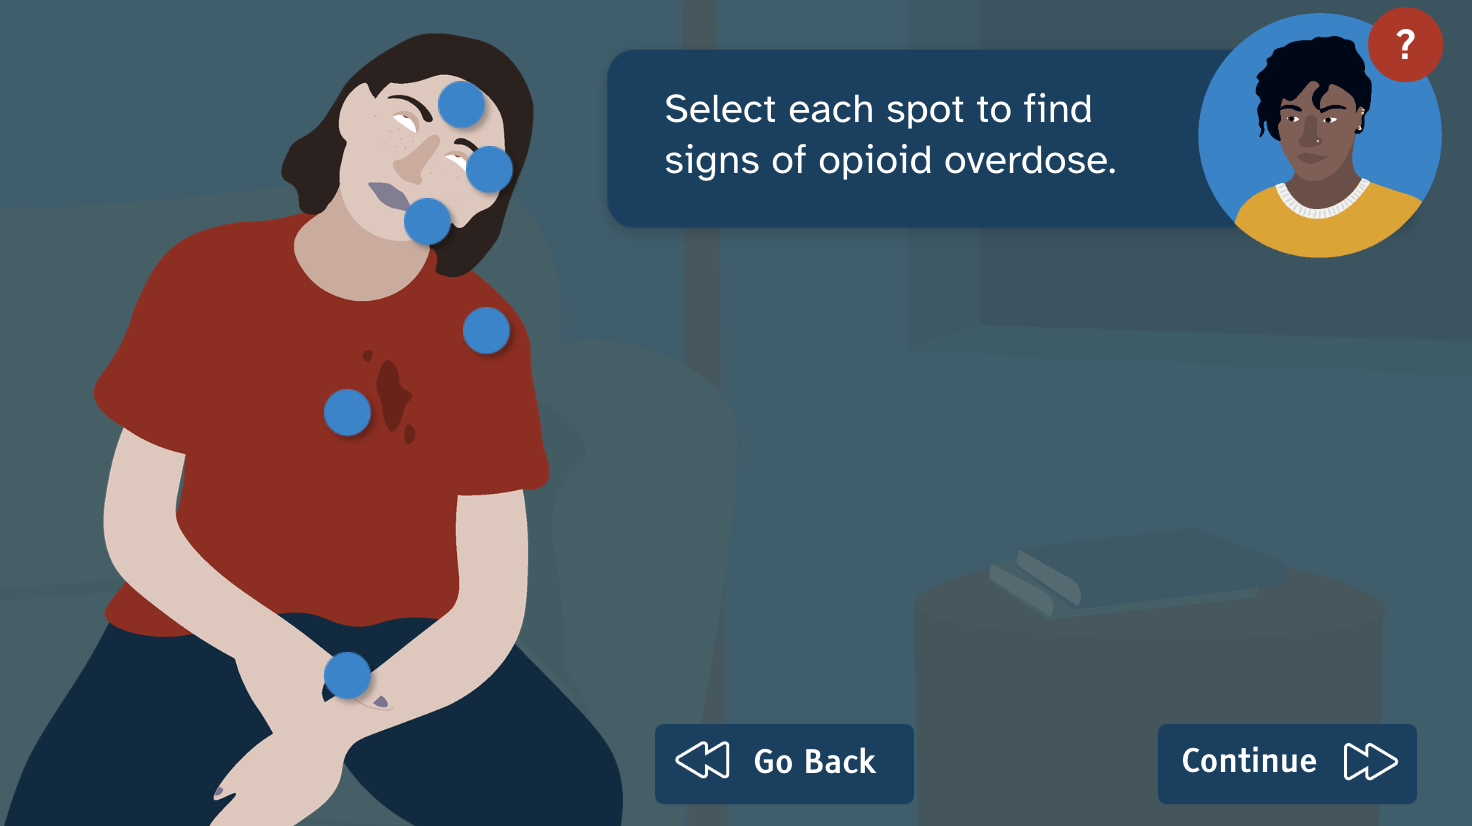
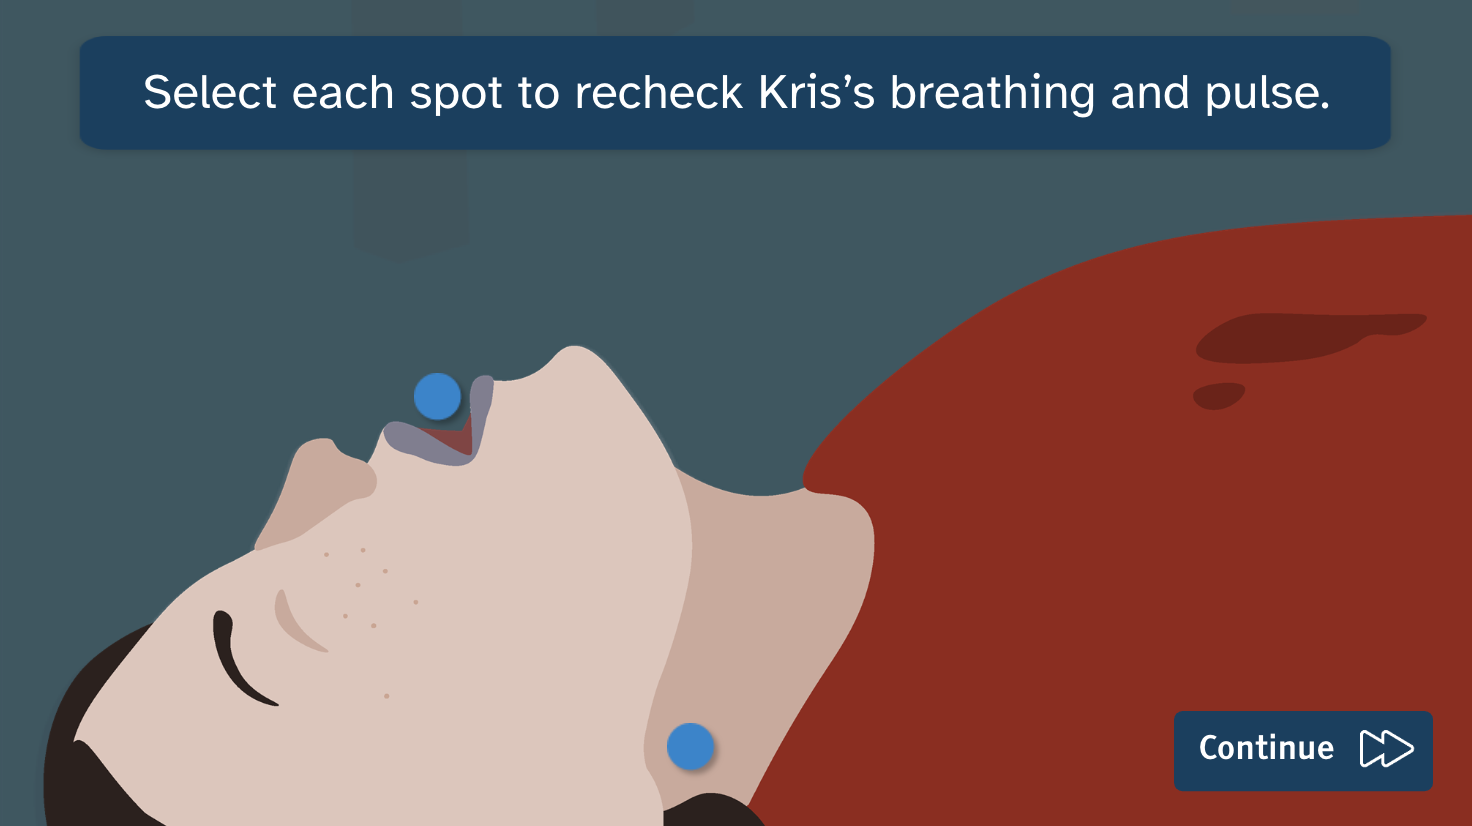
To address some limitations of existing in-person and online training, I wanted to make sure that the training was self-paced, repeatable, and meaningfully interactive to help users absorb and retain the information. Some virtual interactions allow for user choice, such as branching paths, and some reinforce physical actions, such as selecting arrows to prepare ampoules or dragging naloxone to appropriate sites of administration.
The online training includes the following components:
- background information about opioids, overdoses, and naloxone
- an interactive simulated scenario
- a list of additional resources
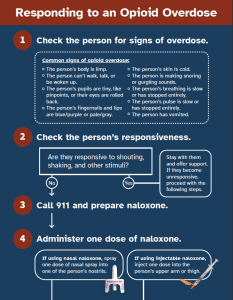
- a printable flowchart job aid for volunteers
Additionally, I developed a supplementary guide that Starling House staff could consult during accompanying in-person training. The guide outlines a framework for assessing volunteers’ knowledge and identifying areas for further support.
With a few minor tweaks, this training could be adapted for seasoned volunteers, new staff, and even clients of Starling House and similar organizations.
Process
In developing this training, I used the SAM (adapted ADDIE) model for structuring my approach, the Action Mapping process for developing learning outcomes and narrative, Gagné’s Nine Events of Instruction to enhance engagement and retention, and Bloom’s Taxonomy to develop questions and tasks for the in-person assessment.
While I went back and forth in an iterative process, my general workflow followed these steps:
- Conducting analysis and research
- Action mapping and defining learning outcomes
- Storyboarding
- Designing mockups
- Creating original illustrations and assets
- Developing a course prototype
- Revising and e-learning user testing
Action Mapping & Learning Outcomes
Tool: Figma
After conducting an audience analysis and subject research, I started to plan the course structure in a Figma FigJam file. Because the opioid overdose response process is based on decision-making and physical actions, I used Cathy Moore’s Action Mapping process to visualize the training structure and develop my learning outcomes.
Using research and information from SMEs, I broke down the opioid overdose response process into stages and identified key decision points. I also identified primary actions and essential knowledge for each stage, which formed the basis for my learning outcomes.
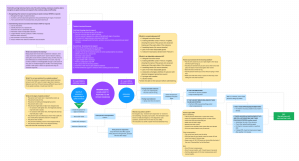
If you’d like to see it in detail, the action map FigJam file is publicly available.
Storyboard
Tool: Google Docs
The action map and learning outcomes helped me form a narrative, which served as a foundation for my text-based storyboard. The storyboard included fields for slide prompts, on-screen text, graphics and images, programming and slide layer notes, and navigation.
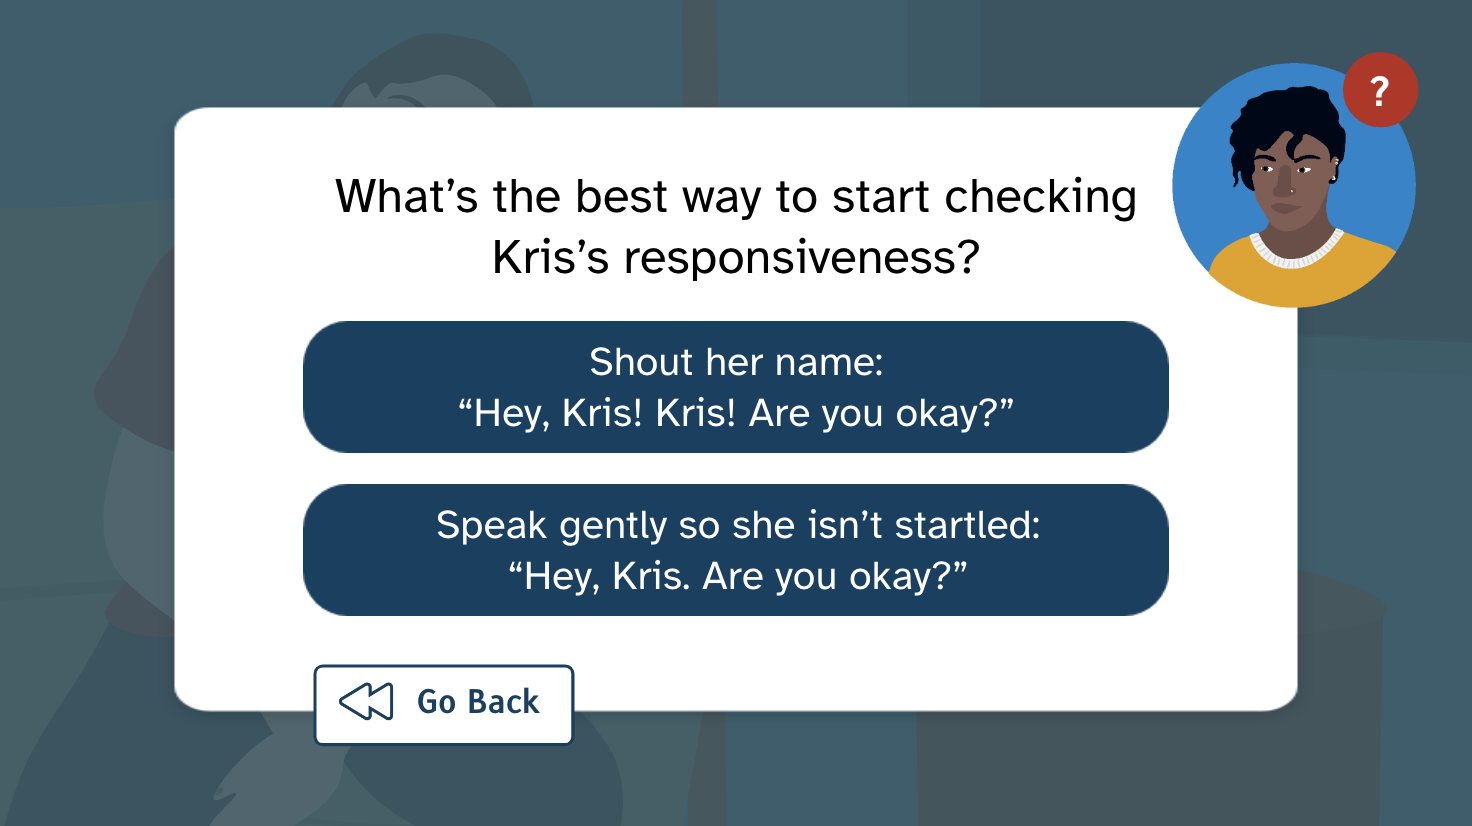
The storyboard also identified branching paths and slide layers based on user choices:
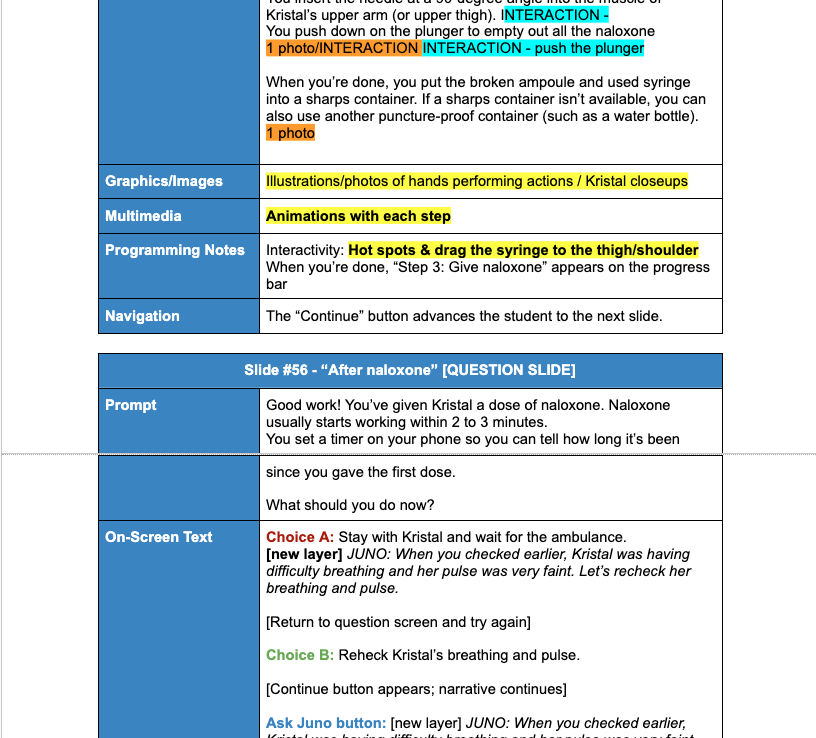
- Learners can choose different courses of action at each “decision point.” If they choose the correct option, the scenario narrative continues. If they choose the incorrect option, they are gently redirected to the correct answer by Juno, a mentor character who guides users through the training.
- Learners can choose to ask Juno a number of pre-set questions throughout the training. Juno can offer advice on what to do at each decision point and provide additional information that a learner might want to know.
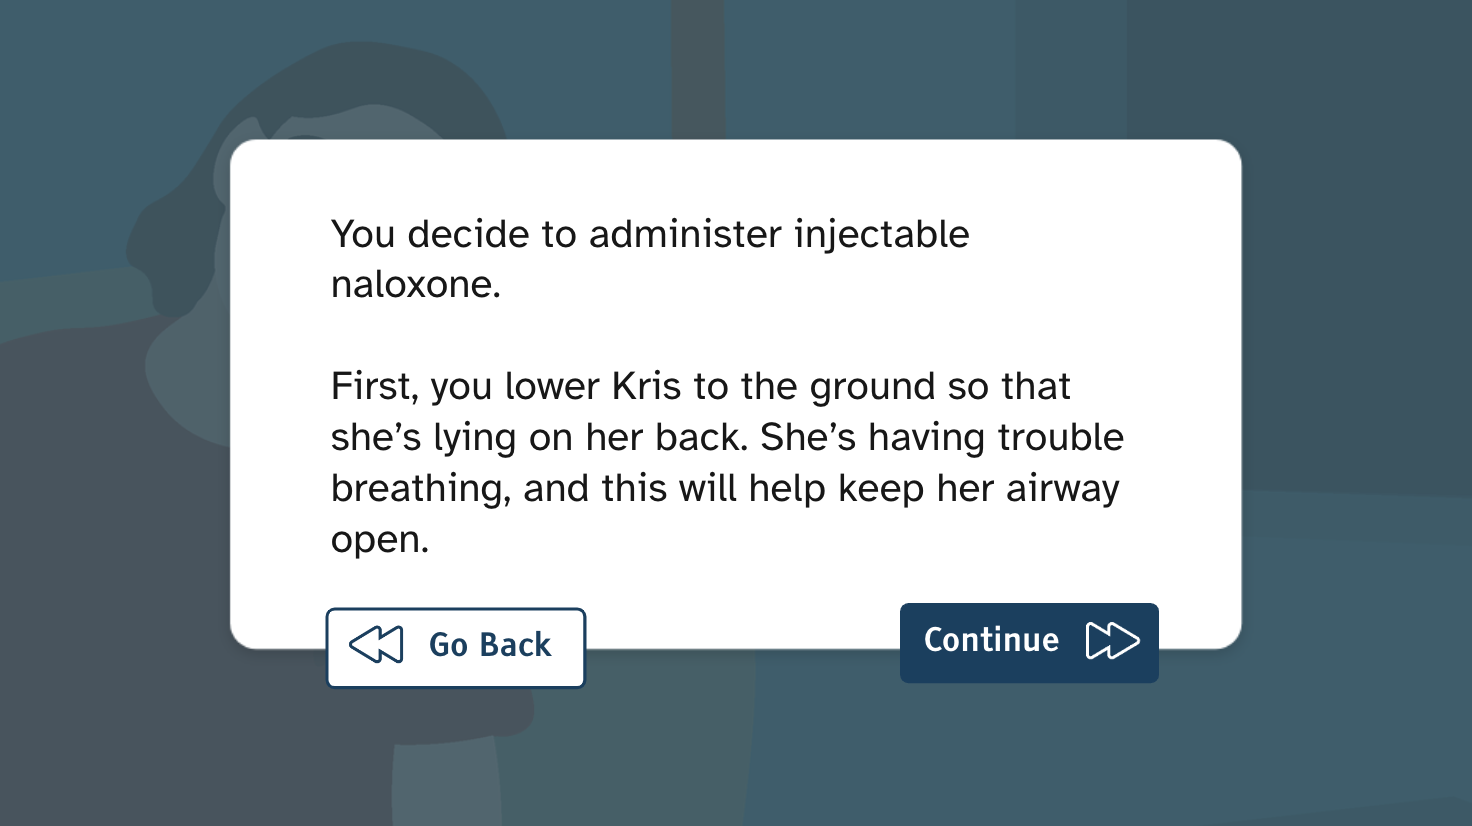
- Learners can choose which naloxone kit they want to use, placing them on a branching path to practice that route of administration. Learners can return to this selection point later if they want to try the other kit.
- Learners can identify their comfort level with CPR, which leads to different instructional material and different narrative descriptions of the CPR they give.
Once I had built my text-based storyboard, I began working on course mockups. If I were working with an actual client and a team, the storyboard process would be extended. I would first get approval for the text-based storyboard, develop assets and mockups, get approval on those, and then create a visual storyboard. But because I was the only person on this project, I iterated on my original storyboard throughout the design process.
Visual Mockups
Software: Adobe XD
Using my storyboard, I identified four main types of slides that would be reused throughout the course:
- Question slides, in which the user selects an answer to a knowledge-assessing question;
- Narrative slides, in which the narrative of the story unfolds;
- Character speech slides, in which the mentor or client character speaks directly to the user;
- Mentor slides, in which the user can ask the mentor character for advice and information.
I also identified multiple points where I needed to program custom action sequences and created individual layouts for each “action slide.” I sought feedback and revised these layouts until they were ready for redevelopment in Storyline.
Additionally, I developed custom illustrations and assets – from characters to speech bubbles to buttons – that would bring the story to life.

Later, once I had finished my course prototype, I returned to XD to develop a job aid of sorts – an opioid overdose response flowchart that learners could download and use for reference. The flowchart is two pages that can be printed, folded, and stored in a naloxone kit.
Original Illustrations & Assets
Software: Adobe Illustrator, Photoshop, and XD
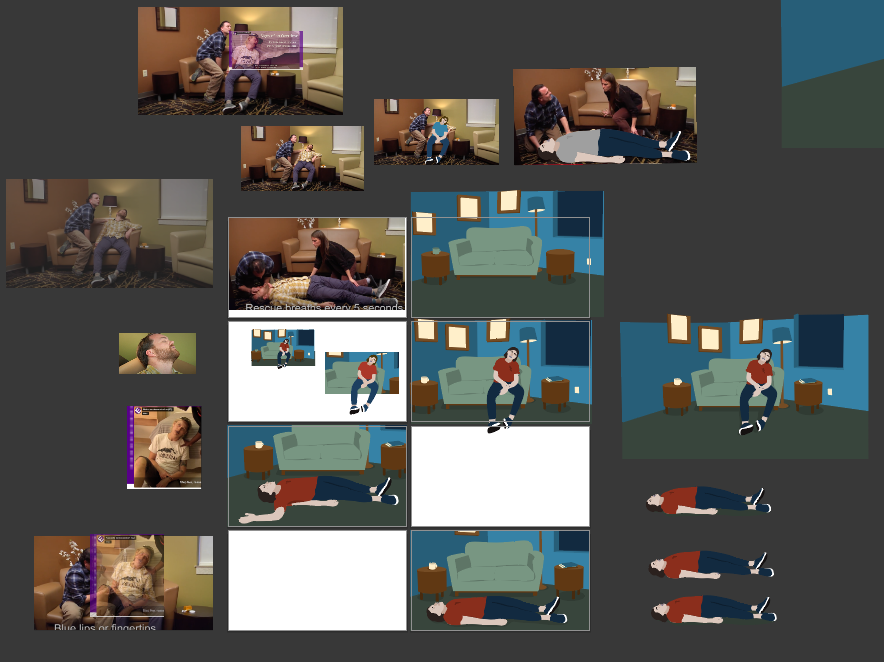
For this project, I challenged myself to build all the training illustrations and graphics from scratch. Using stock photos, video screencaps, and my own photographs as bases and references, I used Adobe Illustrator and Photoshop to develop original assets that would illustrate the course narrative.
In Illustrator, I created two characters – Juno and Kris – and a range of poses and expressions for them that could shift dynamically throughout the course. I also drafted a background to represent a room at Starling House and created different variations to show distance. For navigation, I developed custom arrows for the main buttons and a custom mentor button that users could use to consult Juno.
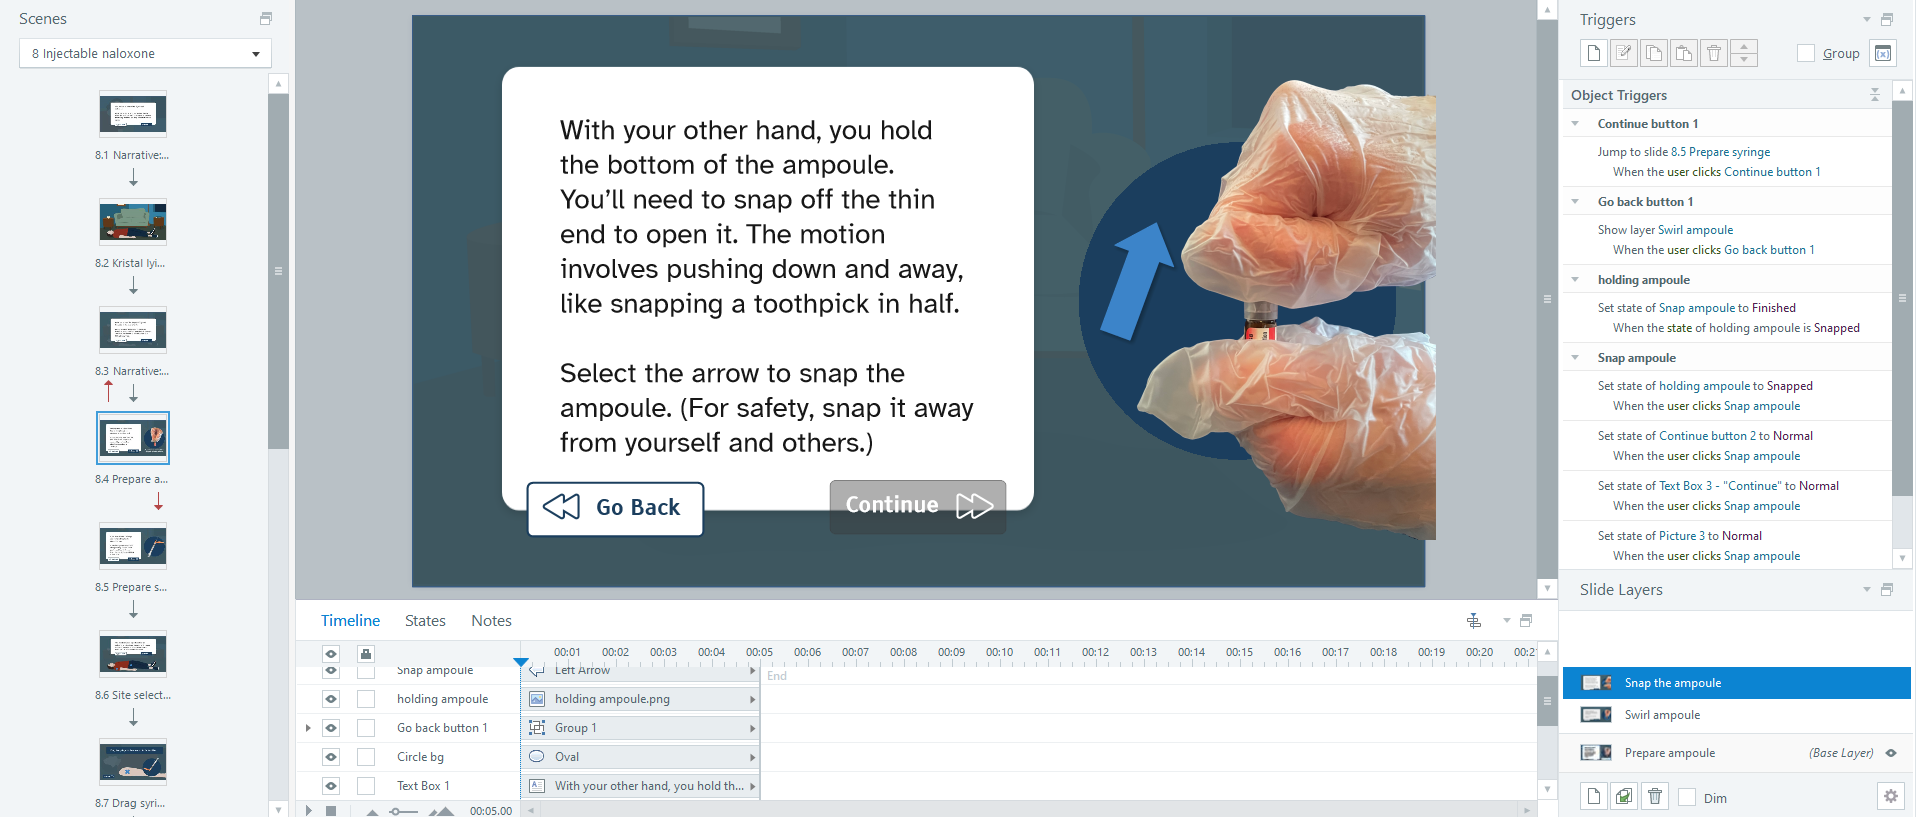
For the action images of naloxone administration, I used photos of my hands performing each step of the process. (I used expired kits so that no naloxone was wasted.) In Adobe Photoshop, I removed the backgrounds from the photos, adjusted their colours, and cropped them for the slides.


Course Development
Software: Articulate Storyline 360
Once I had developed the slide mockups and assets, I put everything together in Storyline to build a course prototype. Working from my storyboard, I programmed animations, interactive object states, slide layers, branching paths, and drag-and-drop interactions that would engage learners and bring the scenario to life.


While building out the course, I made sure that I had considered each of Gagné’s nine events:
1) To gain learners’ attention, I added animations and interactive elements.
2) To inform learners of the objectives, I had Juno, the mentor character, state them in a conversational way.
3) To stimulate learners’ recall, I prompted learners to reflect on their level of experience with CPR.
4) To present the content in an engaging way, I used a mix of interactive text-based and action-based slides.
5) To provide guidance, I integrated a mentor button so that users could consult Juno at key points.
6) To elicit performance, I developed interactive questions and ensured that learners had to perform a specific action or select the correct answer before they could pass through the slides and finish the training.
7) To provide feedback, I had Juno gently correct any incorrect answers. I also developed a staff guide to help staff provide feedback during in-person sessions.
8) To assess performance, I had initially considered making the scenario graded, with branching paths resulting from incorrect answers that would reflect “real-world” consequences. This approach is often employed during scenario-based training in customer service or workplace conduct. In this case, however, an incorrect answer in real life could result in death or serious injury. This could be grim and demoralizing for an audience of new volunteers, so I decided against it.
Instead, I developed an assessment framework (staff guide) for in-person training that Starling House staff could use to check volunteers’ level of knowledge and identify areas that need support. Volunteers would receive assistance from staff or other volunteers until they succeed and feel confident with the skills they need. Because this assessment framework would be most effectively implemented during the accompanying in-person training, it is not integrated into the online portion of the training.
9) To enhance retention, I made all parts of the course repeatable and developed a printable flowchart that learners could print for future reference.


Course Testing and Revision
Software: Storyline and Review 360
After developing an interactive course prototype, I conducted numerous rounds of testing and revisions to improve the training and develop a final version. I tested both desktop and mobile functionality and made sure that the content was as accessible as possible.
Five people tested this project and provided feedback through Review 360. These testers included an SME (a harm reduction counsellor who has responded to overdoses) and four people who were aware of naloxone but didn’t know how to use it. Their feedback helped me clarify information, fix programming errors, and refine the user experience.
Takeaways
From research to final revisions, this training took about 160 hours to develop. I had a tight deadline, and I’m pleased with what I accomplished within that timeframe.
As with any project, of course, there are even more features I would have liked to integrate, and there are lessons that I will bring to my next projects:
Original Illustrations
While challenging, it was also satisfying to create my own illustrations for the course. This was excellent practice for my Adobe Creative Suite skills, and I emerged with a more streamlined flow for working between programs.
Interactivity and Multimedia Elements
- Interactivity: I built a variety of interactive features into the scenario component, including user-triggered custom object states and drag-and-drop slides. Looking back, I would have liked to add more interactive elements into the introductory material too, such as “knowledge check” questions and interactive objects. I think this would improve the pacing of the course and engage learners’ recall from the beginning.
- Animation: I programmed custom slide transitions and object animations into key slides and decision points. With more time, I would have liked to include more complex animations throughout the training to enhance flow and polish.
- Sound: I originally planned to include sound effects and voice-acting recordings throughout the course for immersion and accessibility. During early development, I started to add sound effects (such as a light switch turning on, a snoring sound, and an ambulance siren) but removed them when I realized I wouldn’t have time to build sound into the whole course.
I also wanted to include an audio narration option for learners who have difficulty reading onscreen text. Unfortunately, I found that I had more text when I finished scripting than when I began planning, so I did not have time to record audio narration for the course. With more time, I would have liked to integrate audio throughout the course to improve both engagement and accessibility.
Accessibility
To make the training accessible, I did my best to write in plain language and incorporate features for students with diverse learning needs:
- For learners with anxiety, reading difficulties, or motor difficulties, I avoided giving time limits or rushing readers through the slides.
- For learners on mobile devices or with motor difficulties, I set fonts, buttons, and selection points as large as possible.
- For learners using screen readers, I made sure that all images had alt text. With more time, I would have liked to add key bindings to all controls so that the training could be operated entirely by keyboard.
- For learners with difficulty seeing or reading, I used large text in typefaces that were designed to be accessible (Atkinson Hyperlegible and Tiresias Infofont), and I ensured that font sizes and colour contrast met WCAG AAA guidelines. I regret that I ran out of time before I could add an audio option for every slide; this is an accessibility feature I would like to prioritize in future projects.
Outcome
The response from testers was overwhelmingly positive. They appreciated the custom illustrations, the level of interactivity, and the depth of detail in the training. The SME tester said it was more thorough and interactive than other online naloxone trainings they had completed, and also expressed that they would recommend it to others.
This project was a substantial undertaking. With over 70 slides and many more layers, it was an excellent opportunity to try new Storyline functions and develop a suite of graphic assets from scratch. The process was immensely rewarding, and I especially enjoyed the mockup design, illustration, and programming stages.
Harm reduction has long been a passion and value of mine, and I wanted to create a learning experience that would share harm reduction principles and skills with others in a meaningful way. I hope others can find this training useful in developing a valuable and life-saving ability.
Note: While I am a proponent of harm reduction, I am not a medical professional or harm reduction specialist. I relied heavily on government, medical, and community health sources to build this training. To the best of my knowledge, all information is accurate and up-to-date as of March 2023. A full list of sources is available on the last slide of the training.
Mockup image credit: rawpixel.com on Freepik
